How we optimized a MEAN Stack project for better performance
MEAN Stack – Performance Optimizations
In the past few years, MEAN stack went from ‘yet another shiny JS thingy’ to being a viable alternative to build high-performance web applications. We have quite a few medium to large apps running, that are MEAN.
One of our recent MEAN projects saw rapid growth in the user base (hundreds of thousands of users within the first few weeks), resulting in the system hitting the initially designed max-loads much earlier than anticipated. Hence we had to review the architecture and performance parameters to identify and fix the bottlenecks.
This blog is a quick rundown of the whats and hows in our initial performance tuning. Since the system was hosted in AWS, we used Amazon services wherever possible.
We implemented the following to improve the MEAN Stack project performance.
-
Introduction of Load balancing
-
NodeJS Clustering
-
Amazon S3 as CDN
-
Mongo replication
-
Microservice implementation
Load Balancing
When it comes to increasing the performance of websites and web services, there are a couple of options:
- Improve the efficiency of the code.
- Throw more hardware at it.
Option two (throwing in more hardware) is the fastest and easiest solution to mitigate the performance woes.
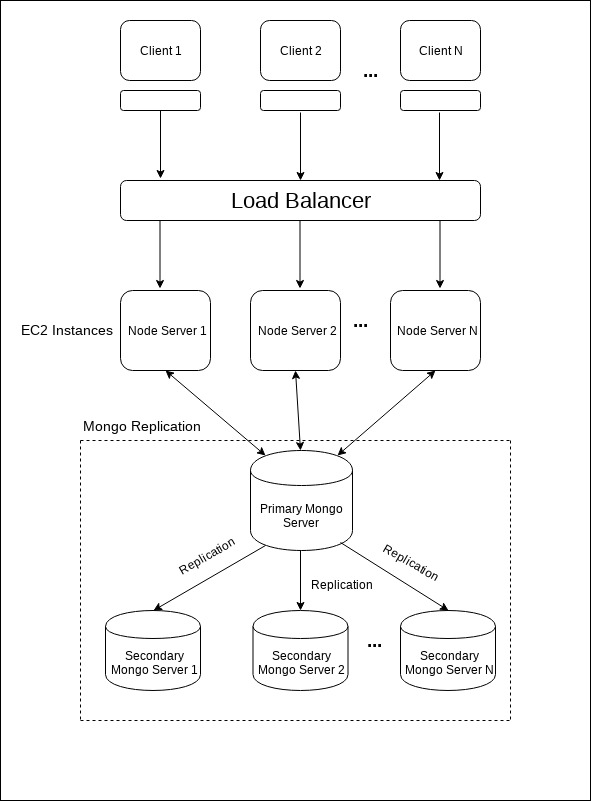
Let us discuss how we can scale the Node.js server infrastructure using ELB, which stands for Elastic Load Balancing. ELB automatically distributes the incoming application traffic across a group of backend servers. The load balancer routes the incoming requests to the second server when the first server is busy processing other requests so that the end user does not experience any delay in getting the response.
There are three types of load balancers:
-
Application Load Balancer
-
Network Load Balancer
-
Classic Load Balancer
Application Load Balancer is best suited for load balancing of HTTP and HTTPS traffic and provides advanced request routing targeted at the delivery of modern application architectures, including microservices and containers. Operating at the individual request level (Layer 7), Application Load Balancer routes traffic to targets within Amazon Virtual Private Cloud (Amazon VPC) based on the content of the request. The socket forwarding is supported only in the application load balancer. So we have used the Amazon AWS application load balancer to scale the server architecture.
The decision on how many servers to be used in the load balancer depends upon the traffic expected in the server and the number of concurrent requests the server needs to handle. Moreover, it also depends upon the system configurations in which the server is hosted such as the number of cores, memory, etc. We also need to change some web server(ex: nginx or apache) configurations as described here.
To discover the availability of your EC2 instances, a load balancer periodically sends pings, attempts connections, or sends requests to test the EC2 instances. These tests are called health checks. The status of the instances that are healthy at the time of the health check is InService. The status of any instances that are unhealthy at the time of the health check is OutOfService. The load balancer performs health checks on all registered instances, whether the instance is in a healthy or unhealthy state.
The load balancer routes request only to the healthy instances. When the load balancer determines that an instance is unhealthy, it stops routing requests to that instance. The load balancer resumes routing requests to the specific instance when it has been restored to a healthy state.
The load balancer checks the health of the registered instances using either the default health check configuration provided by Elastic Load Balancing or a health check configuration that the developer configures. In the second case, the developer has to give one health checking URL ({main domain}/health) to the IT team (who are doing the ELB implementation), which serves as the health status of the instance.
The health URL should be an API configured in Node.js program, which connects to the database and fetches some lightweight data to make sure that the instance is properly working i.e, it ensures the health of web server (Nginx), server (Node.js instance) and the database server (MongoDB). If this API could respond with the HTTP status 200 within a particular time (Say 2 seconds, which we can set in the load balancer configuration), the instance is marked as healthy, otherwise, it’s marked as unhealthy.
The load balancer periodically (Say 10 sec, which we can set) checks the health status of each instance (If we scaled to 2 servers – checks these 2 instances) through the corresponding health URL, to mark it healthy or unhealthy. So, when the next request comes, the load balancer routes the request to a healthy server instance which is available.
We are using the LoopbackJs – a Node.js framework, and we can put the following code in the folder called server/boot (In loopback framework folder structure) to create the health checking API URL. You can use your own API path if needed.
module.exports = function(server) {

 var router = server.loopback.Router(); // router module

  router.get('/health', function(req, res) {

       server.models.ServerHealthStatus.findOne({where: {status: 1}, fields: "status"}, function(err, healthStatus) {

           var response = "";

           if (err) { //failure

               res.status(400).send(response).end();

           } else {

               if (healthStatus) { // success

                   response += "Health: OK";

                   res.send(response); // http status: 200

               } else { //failure

                   res.status(400).send(response).end();

               }
           }
       });

 });

};
In this code, ServerHealthStatus is a model which is mapped to the mongo database collection (Similar to a table in MySQL) – ServerHealthStatus, which is having the following one document (Similar to row in MySQL):
{

     "_id" : ObjectId("5b2b7u5d1726126da11b1f98"),

     "status" : "1"

}
The model query tries to fetch this document, and sends the response – either 200 or 400 depending upon the query result. If the Node.js service is busy with processing other requests, it may fail to retrieve data or it may take more time to respond, which may exceed the time that we have configured in the load balancer timeout.
Since our server is distributed over multiple instances, firstly, we need to make sure that, the resources like images or files (user profile images, documents) are located in a place, which is accessible to all instances. Earlier, we may have been using the local file system for resource storage. Since the load balancer is implemented, there are multiple instances which need these contents to be accessible. So in order to solve this problem, it must be saved in a common place like Amazon S3.
After hosting the server, we need to do the load testing with some automated tools to make sure that the server can handle the specified number of concurrent requests and handle the traffic. If it fails, we need to increase the server configurations or the number of server instances until it meets the required standards. We need to periodically track the server for the CPU and memory usage while doing the load testing. After implementing the load balancer, we need to do the failover test as well.
Besides, we need to manually down one instance and check whether other instances serve the client request without any delay. Also, we must carry out the load testing by putting the load specified in the project requirement (say, 10K concurrent requests).
Node.js Clustering

A single instance of Node.js runs in a single thread. To take advantage of multi-core systems, the user will sometimes want to launch a cluster of Node.js processes to handle the load. The cluster module allows easy creation of child processes that all share server ports.
const cluster = require('cluster');

const http = require('http');

const numCPUs = require('os').cpus().length;

if (cluster.isMaster) {

 console.log(`Master ${process.pid} is running`);

 // Fork workers.

 for (let i = 0; i < numCPUs; i++) {

   cluster.fork();

 }

 cluster.on('exit', (worker, code, signal) => {

   console.log(`worker ${worker.process.pid} died`);

 });

} else {

 // Workers can share any TCP connection

 // In this case it is an HTTP server

 http.createServer((req, res) => {

   res.writeHead(200);

   res.end('hello world\n');

 }).listen(8000);

 console.log(`Worker ${process.pid} started`);
}
Amazon S3 as CDN
We were using the local file system for storing static resources (images, JSON files etc.). Since the load balancer is implemented, there are multiple instances which need these contents to be accessible, so, it must be saved in a common place. Amazon S3 was the automatic choice since we were already on AWS.
Mongo replication
A replica set is a cluster of MongoDB database servers that implements master-slave (primary-secondary) replication. Replica sets also failover automatically, so, if one of the members becomes unavailable, a new primary host is elected and your data is still accessible. We have used 3 mongo servers. The entire process is clearly described here:
https://linode.com/docs/databases/mongodb/create-a-mongodb-replica-set
We will specify the server domain names or IPs of the mongo servers in the database connection URL like this:
mongodb://userName:password@mongo1,mongo2,mongo3/databaseName?replicaSet=rs0&connectTimeoutMS=180000&socketTimeoutMS=180000
Where mongo1, mongo2 & mongo3 are the mongo server names(which uses internal domain names, since all server exists inside one AWS account, admins can give user defined names mapped to IP address, which can be used instead of IP addresses in the mongo connection URL) which is pointing to different IP addresses.
In the loopback structure, need to change the connection URL in the datasources.json (it will change to datasources.prod.json when we are in the production environment) file in the folder called server like this:
{
"db": {

   "name": "db",

   "connector": "mongodb",

   "url": "mongodb://userName:password@mongo1,mongo2,mongo3/databaseName?replicaSet=rs0&connectTimeoutMS=180000&socketTimeoutMS=180000"

 }
}
Microservices FTW
Splitting up independent functionality to a stand-alone service can help with the system performance a lot. Node, with its asynchronous, event-driven architecture, is well suited for this.
If there are complex operations that require lots of system resources (CPU, RAM) for a considerable amount of time, check whether these can be moved out as a microservice. So the load is not reflected in the main server(s). We can implement this functionality in an independent server which can be accessed via an API URL. The main server will trigger this API URL for getting this task done.
For example: Sending push notification functionality to mobile apps
Our app has an alert functionality, where notification gets sent to hundreds of thousands of devices at once. Sending notifications involves selecting the device token IDs from the database to those users who have to be alerted, which proved to be an involved task with the non-relational nature of Mongo.
Since the push notification sending functionality is a time-consuming process, the server load will be high during this process which may result in queueing other incoming requests. In order to solve this, we have separated the push notification functionality to an independent server as a microservice.
After implementing all these, we can monitor the resource usage of all the servers while performing the functionalities especially the complex functionalities.
In conclusion, optimizing the performance of a MEAN stack project requires efficient database querying, caching implementation, and resource management. For expert assistance, it is advisable to partner with a custom software development company to optimize the performance of your MEAN stack project.
Please note that this is in no way a complete list. Optimizations vary based on a number of factors from architecture and functionality to client preferences.
Stay up to date on what's new

About the Author

Recommended Posts

16 Mar 2023 Utilities Travel
Top 10 Tech Stacks That Reign Software Development in 2024
/*! elementor - v3.23.0 - 25-07-2024 */ .elementor-heading-title{padding:0;margin:0;line-height:1}.elementor-widget-heading .elementor-heading-title[class*=elementor-size-]>a{color:inherit;font-size:inherit;line-height:inherit}.elementor-widget-heading .elementor-heading-title.elementor-size-small{font-size:15px}.elementor-widget-heading .elementor-heading-title.elementor-size-medium{font-size:19px}.elementor-widget-heading .elementor-heading-title.elementor-size-large{font-size:29px}.elementor-widget-heading .elementor-heading-title.elementor-size-xl{font-size:39px}.elementor-widget-heading .elementor-heading-title.elementor-size-xxl{font-size:59px}Top 10 Tech Stack That Reign Software Development in 2025 What is a Tech Stack? A tech……

23 Jan 2020
Why Is It High-Time To Find Alternatives For Microsoft Silverlight?
It's Time to Bid Goodbye to the Legacy Technology! The decade’s end has seen numerous inevitable changes in the technology market. It hasn’t been long since we bid adieu to……
Featured Blogs


Stay up to date on
what's new